
SQLite is an excellent choice of database technologies to get started with on the Pi for a number of reasons:
- It is incredibly easy to install.
- Python comes with built in support for connecting to it.
- It is free and open source.
- Databases are stored in a single file which you can directly connect to from your code, without the need of a running server process.
- The library is small.
- And yet a serious product being used in many well known products such as Mozilla's Firefox web browser. Check this page out for a full list.
But I suspect that SQLite will be a good fit for many projects on the Pi.
Installation
I said that it was easy to install so here goes. Boot your Pi up to the command line (or if you are already in the graphical interface open LXTerminal) and type:
sudo apt-get install sqlite3
Wait while it downloads and installs; and you are done.
Creating Your First Database
So now we have installed it, the next step is to create a database. You'll be pleased to know this is equally easy. You will remember from above that I said SQLite databases were a single file. So all we need to decide is what we are going to call that file and where we are going to save it. For this example we shall call it MyFirstDatabase.db and we'll just save it in the default home folder. So still on the same command line type:
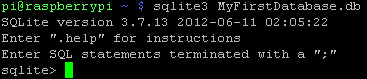
sqlite3 MyFirstDatabase.db
You don't need to worry about any configuration options because there are none. You are greeted by the sqlite command prompt

and that is it; you have created your first database and are connected to it. There is one slight caveat to this. SQLite has not yet actually created the database file, so if you were to exit SQLite now and look for MyFirstDatabase.db you wouldn't find it. Why? Well we haven't created any content for our database yet and with no content what do we actually have? So let us start adding some content.
In SQLite, data is stored in data tables which conceptually look much like data tables you would encounter in the real world:

First we need to create the table and then we need to add the data into that table. To do both of these tasks we are going to use a language called SQL.
To create the table as shown type the below at the sqlite> prompt and press enter:
CREATE TABLE fruit ( name TEXT, calories INT, price NUMERIC);
Don't forget the semicolon on the end. If you do (as I always seem to) just put it on the next line and press enter. That's it, you've just created a table called fruit.
So what did we do?
Well fruit is the name of the table that we created and what we will use to refer to the table when we want to put data in and get data out of it. name, calories and price are the names of the three columns; TEXT, INT and NUMERIC are the datatypes for the corresponding columns.
Now if we exit SQLite we will find that it has created MyFirstDatabase.db. Type
.exit
and then
ls
 and we can see our newly created database sitting happily in the filesystem:
Well now we have a table the next step is to get some data into it and again we are going to do this using SQL.
Reconnect to the database with the same command as before
sqlite3 MyFirstDatabase.db
Then to insert the first row of data you can see in the table above we type
INSERT INTO fruit values("Raspberry", 60, 4.99);
repeat for the next two rows
INSERT INTO fruit values("Apple", 52, 0.79);
INSERT INTO fruit values("Orange", 85, 2.5);
Great now our table has three rows of data, but how do we check what is there?
To see what data is in a particular table we use the SQL select command.
SELECT * FROM fruit;
which shows us the three rows of data we just added:

the * just means give me all columns. Alternatively if we just wanted to see a subset of columns we could have typed
SELECT name, price FROM fruit;
now we just get the name and price columns returned

What if we want to filter a particular subset of rows? For that we need a where clause
SELECT * FROM fruit WHERE price > 3;

gives us all rows where the price is greater than 3. Or
SELECT * FROM fruit WHERE name = "Apple";

returns just the Apple row of data.
The SELECT statement is really one of the cornerstones of the SQL language and these are just some very basic examples of what you can do with it.
If we want to remove data from our table then we can use the DELETE command.
which is very similar to the SELECT command so
DELETE FROM fruit WHERE name = "Raspberry";
will delete the Raspberry row
DELETE FROM fruit;
will delete all of the rows in the fruit table.
Look out for my next blog where we will look at how we can connect to our database from Python. Essential if we want to start making use of databases in our projects.
You don't need to worry about any configuration options because there are none. You are greeted by the sqlite command prompt
and that is it; you have created your first database and are connected to it. There is one slight caveat to this. SQLite has not yet actually created the database file, so if you were to exit SQLite now and look for MyFirstDatabase.db you wouldn't find it. Why? Well we haven't created any content for our database yet and with no content what do we actually have? So let us start adding some content.
Creating Your First Table
In SQLite, data is stored in data tables which conceptually look much like data tables you would encounter in the real world:
First we need to create the table and then we need to add the data into that table. To do both of these tasks we are going to use a language called SQL.
"Wait a second..." I hear you say. "I thought we were already using SQLite, now we need another SQL? And what's the difference?"
OK, good question. SQL stands for "Structured Query Language" and it is a language much like Python is a language. Though not strictly a programming language in the traditional sense, but specifically tailored for querying data. SQLite is a program which let's you run SQL commands, much like the Python editor on your desktop will let you run a Python program, but also provides the whole mechanism of what to do with those commands. SQL is found in industry applications such as SQL Server, Oracle, MySQL and many others. Every program has a slightly different flavour of SQL, but the basics will be the same across all of them and well worth your time to learn.
To create the table as shown type the below at the sqlite> prompt and press enter:
CREATE TABLE fruit ( name TEXT, calories INT, price NUMERIC);
As a helpful note, all commands in this blog post in blue text are SQL commands and should be entered at the sqlite> prompt. Any commands in red text should be entered at the standard Linux command line $ prompt.
Don't forget the semicolon on the end. If you do (as I always seem to) just put it on the next line and press enter. That's it, you've just created a table called fruit.
So what did we do?
Well fruit is the name of the table that we created and what we will use to refer to the table when we want to put data in and get data out of it. name, calories and price are the names of the three columns; TEXT, INT and NUMERIC are the datatypes for the corresponding columns.
For anyone who has used any other SQL database engines in the past it is worth noting here that SQLite uses a dynamic data type system. This means you can actually store any type of data in any column. The data types that you define when you create the table are merely recommended data types and do not enforce the type of data which can be stored in a particular column. A more detailed explanation can be found on the SQLite website here.
Now if we exit SQLite we will find that it has created MyFirstDatabase.db. Type
.exit
and then
ls
and we can see our newly created database sitting happily in the filesystem:Inserting Data
Well now we have a table the next step is to get some data into it and again we are going to do this using SQL.
Reconnect to the database with the same command as before
sqlite3 MyFirstDatabase.db
Then to insert the first row of data you can see in the table above we type
INSERT INTO fruit values("Raspberry", 60, 4.99);
repeat for the next two rows
INSERT INTO fruit values("Apple", 52, 0.79);
INSERT INTO fruit values("Orange", 85, 2.5);
Great now our table has three rows of data, but how do we check what is there?
Querying Data
To see what data is in a particular table we use the SQL select command.
SELECT * FROM fruit;
which shows us the three rows of data we just added:
the * just means give me all columns. Alternatively if we just wanted to see a subset of columns we could have typed
SELECT name, price FROM fruit;
now we just get the name and price columns returned
What if we want to filter a particular subset of rows? For that we need a where clause
SELECT * FROM fruit WHERE price > 3;
gives us all rows where the price is greater than 3. Or
SELECT * FROM fruit WHERE name = "Apple";
returns just the Apple row of data.
The SELECT statement is really one of the cornerstones of the SQL language and these are just some very basic examples of what you can do with it.
Deleting Data
If we want to remove data from our table then we can use the DELETE command.
which is very similar to the SELECT command so
DELETE FROM fruit WHERE name = "Raspberry";
will delete the Raspberry row
DELETE FROM fruit;
will delete all of the rows in the fruit table.
TIP: If you want to re-add the data you just deleted, a quick way to do this is to press the up arrow on the command prompt to get back the insert commands you initially used to add the data and just press enter on each one to run that command again.
Next
Look out for my next blog where we will look at how we can connect to our database from Python. Essential if we want to start making use of databases in our projects.
I want to connect my database through a Python Program but i cannot find your next blog in which you connected the database with python program, can you please give me a direct link to that blog.. Thanks. Ahsan
ReplyDeleteI'm afraid that post is still a work in progress. Probably be completed next year now I'm afraid. Thanks Adam
DeleteThanks for the post, i'll wait for next one.
ReplyDeletehttp://www.blog.pythonlibrary.org/2012/07/18/python-a-simple-step-by-step-sqlite-tutorial/
ReplyDeletethis link might help for python code working with SQLite.
Good blog post. Helpful
I savour, lead to I found exactly what I used to be having a look for. You’ve ended my four day long hunt! God Bless you man. Have a nice day. Bye 토토
ReplyDeleteIt’s very simple to find out any topic on web as compared to textbooks, as I found this paragraph at this website. 카지노사이트
ReplyDeleteI accidentally searched and visited your site. I still saw several posts during my visit, but the text was neat and readable. I will quote this post and post it on my blog. Would you like to visit my blog later? keonha cai
ReplyDeletemmorpg oyunlar
ReplyDeleteİnstagram Takipci Satın Al
Tiktok jeton hilesi
Tiktok jeton hilesi
Sac ekimi antalya
referans kimliği nedir
instagram takipçi satın al
Mt2 pvp
instagram takipçi satın al
perde modelleri
ReplyDeleteNumara Onay
mobil ödeme bozdurma
Https://nftnasilalinir.com
ANKARA EVDEN EVE NAKLİYAT
trafik sigortası
DEDEKTOR
web sitesi kurma
aşk kitapları
Smm panel
ReplyDeleteSmm panel
iş ilanları
instagram takipçi satın al
HIRDAVATÇI BURADA
www.beyazesyateknikservisi.com.tr
Servis
Jeton Hile